Viewing and Filtering Data
ZeyOS is designed to handle large volumes of data — from thousands of contacts to extensive transaction histories. Especially when the system is shared by many users, efficient filtering is essential to maintain a clear overview. Although ZeyOS includes many different applications, the filtering mechanics are consistent across all of them.
The Filter View (Overview)
When you open any app in ZeyOS, you are presented with the filter view (also called the overview or index). It displays your data as a table and provides powerful tools for searching, filtering, and customizing the display. The filter view consists of the following elements:
- App-Specific Buttons & Tabs — Located in the top-left corner.
- The Filter Field — A smart search box above the data table.
- The Saved Filters Menu — For storing and loading filter presets.
- Filter Shortcuts — Quick-access buttons for common filters (e.g., Personal, Followed).
- The Field Selection Dialog — For choosing which columns to display.
- The Reload Button — To refresh the current view.
- The Export Button — To download data in various formats.
- The Mindlog Button — To view Mindlog entries related to the current app.
- The Filter Sidebar — On the right, with default filters for status, categories, and related entities.
- The Data View — The table displaying your data.
App-Specific Buttons & Tabs
Every filter view includes a button to create a new element for that app, plus additional buttons that may link to specific views or custom weblets. Larger apps (such as Transactions or Inventory) are subdivided into tabs that represent different aspects of the app.
The Filter Field
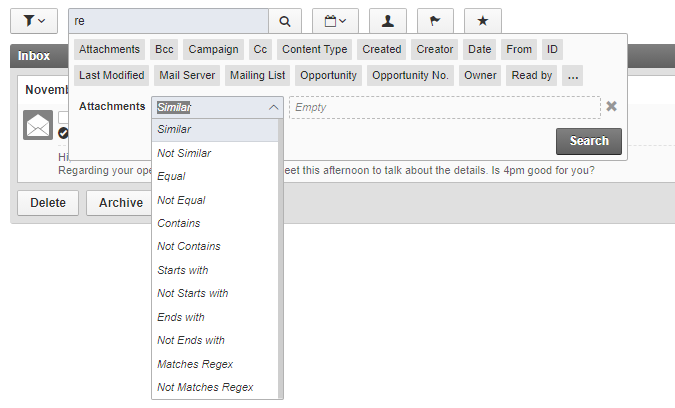
The filter field is the main search and filter tool located above the data table. It supports both simple text searches and advanced field-based filtering.
How to use the filter field
- Click into the filter field — A dropdown appears showing all available fields for the current view.
- Select a field — Choose the field you want to filter by, or start typing to narrow down the list.
- Choose a comparison operator — After selecting a field, choose how to compare (e.g., "equals", "contains", "greater than"). The default is "same or similar".
- Enter a value — Type the value you want to filter for and press Enter.
- Add more filters — Repeat the process to combine multiple filters. Each active filter is displayed as a tag above the table.
- Remove a filter — Click the X on any filter tag to remove it.
Filter Shortcuts
Many apps offer shortcut buttons for the most commonly used filters. These may include:
- Date filters with popular ranges such as "Since 180 days" or "Last month".
- Unread button to show only unread messages or notifications.
- Personal button to show only elements that you own or are assigned to.
- Followed button to show only elements you have marked with the Follow flag.

View Modes: Table and Cards
The filter view supports two display modes, accessible via toggle buttons in the top right:
- Table view — The default mode showing data in rows and columns. Best for detailed comparisons and sorting.
- Cards view — Displays elements as cards in a grid layout. Provides a visual overview that is especially useful for contacts and accounts.
The selected view mode is user-specific and remembered per app.
The Field Selection Dialog
You can customize which columns are displayed in the table view.
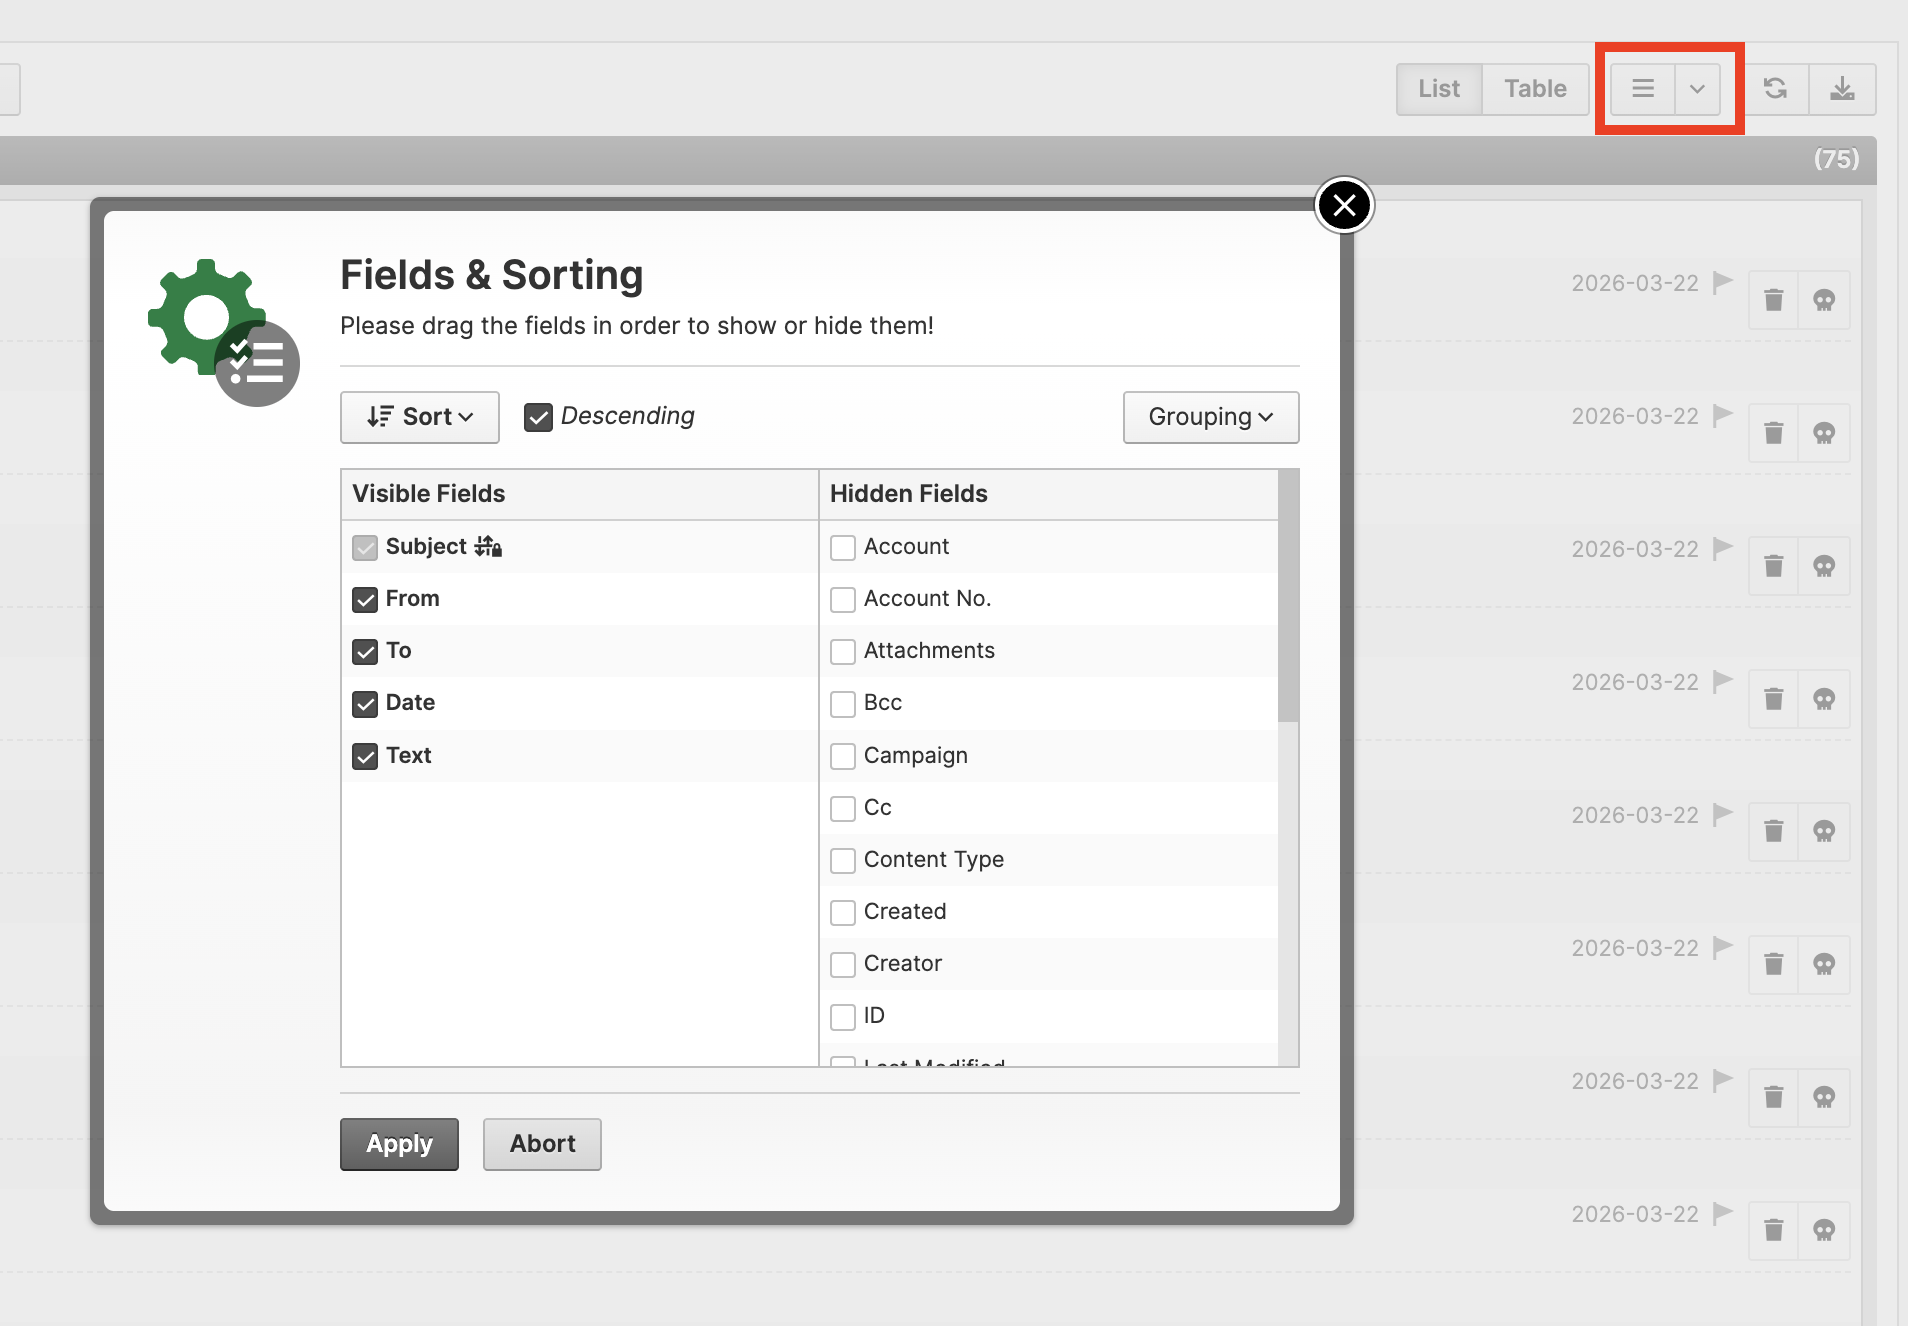
How to customize columns
- Click the list icon in the top-right corner of the table view.
- In the dialog that opens, you can add or remove columns from the current view. All available fields — including custom fields — are listed.
- Reorder columns by dragging them into the desired position.
- Group data by a specific column using the grouping option.
- Sort data (ascending or descending) by clicking a column header. A small arrow icon indicates the current sort direction.
Saving Views and Column Layouts
You can save your current column selection for later use:
- Click the dropdown arrow icon next to the field selection.
- Select Save Current Fields... and enter a name.
- To load a saved layout, open the same dropdown and select it from the list.
These settings are user-specific — each user can create and switch between their own saved layouts without affecting other users.
The Saved Filters Menu
Frequently used filter combinations can be saved and loaded:
- Set your desired filters using the filter field and shortcuts.
- Click the dropdown button at the far left of the filter bar.
- Select Save Current Filters... and enter a name.
- To load a saved filter, open the dropdown and select it from the list.
- To delete a saved filter, click the X next to its name in the dropdown.

The Reload Button
The reload button refreshes the current view while keeping all active filters in place. Use it when you want to see the latest changes made by other users or to check for new entries.
The Export Button
ZeyOS provides standard export formats for every app:
| Format | Description |
|---|---|
| XLS | Excel Spreadsheet |
| ODS | OpenDocument Spreadsheet (e.g., for LibreOffice Calc) |
| CSV | Comma-Separated Values |
| TSV | Tab-Separated Values |
| XML | Extensible Markup Language |
| JSON | JavaScript Object Notation |
Some apps offer additional export formats, such as iCalendar for tasks or vCard for contacts. Custom exports can also be configured for specific needs (e.g., a tailored export for your accounting software).
The Mindlog Button
The Mindlog button in the filter view opens the Mindlog with a pre-applied filter for the current app's entity. This lets you quickly see all Mindlog entries related to the app you are currently working in.
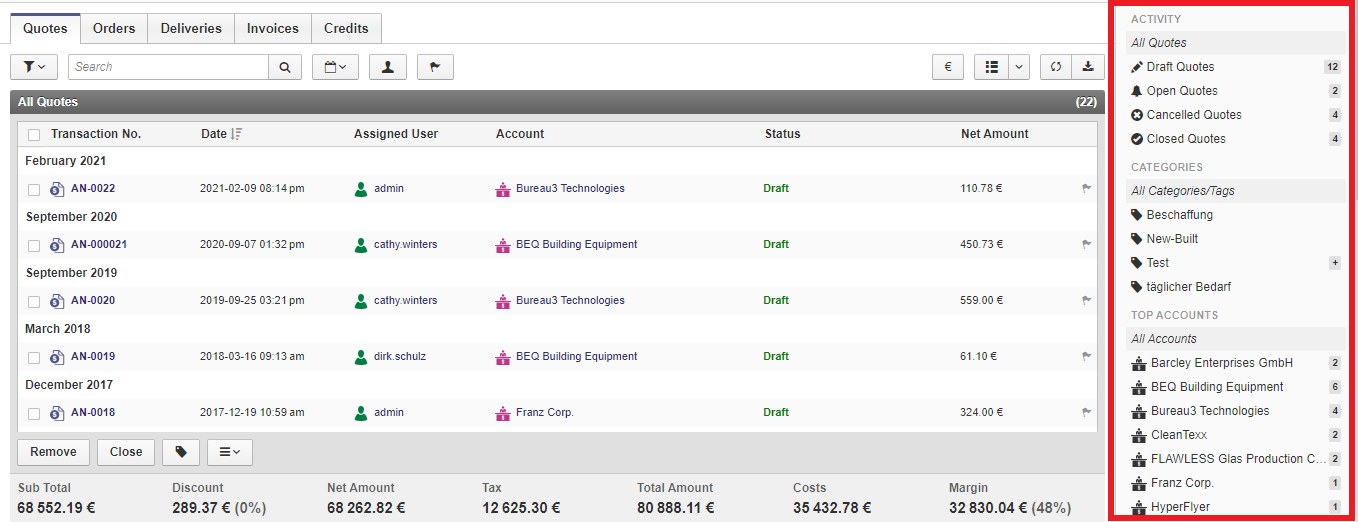
The Filter Sidebar
The filter sidebar on the right side of the filter view provides quick access to commonly used filter criteria. Depending on the app, these typically include:
Status and Activity
Filter elements by their current status, such as drafts, open items, canceled items, or completed items. The available options are tailored to each module.
Categories and Tags
Filter objects by their assigned categories or tags. The sidebar shows all categories that have been defined for the current app. You can:
- Click a category name to filter by it.
- Click More to search for a specific tag directly.
- Edit categories by hovering over "Categories" and clicking the pencil icon.
Secondary Entity
The third filter option refers to the secondary entity associated with the current module. For example:
- In Transactions: filter by customer or supplier.
- In Inventory: filter by warehouse.
The sidebar initially shows the most frequently used secondary entities. Click More to search for a specific one.